Configuring an IDE for Building and Executing on Milk-V Duo
Building programs with C or C++ for the Milk-V Duo device is nicely explained by the Milk-V Duo examples on GitHub. However, while the process explained in the examples is nice for proof of concept, I really want the comfort and convenience provided by my IDE, so on with the rubber gloves again, and upon success I wrote this post for your convenience and as a sort of note for future me. Follow along if you feel like it.
This post is part of a series on the Milk-V Duo
This post explains how you can configure QtCreator for building a C++ application foe, deploying it to and executing on an Milk-V Duo device.
- A working Linux development machine
- Completion of a previous post on configuring ssh access or similar.
1 Downloading the SDK and Tool Chain
First clone the SDK and tool chain and to $SOMEWHERE like in listing 1
$ cd $SOMEWHERE
$ git clone --recursive --depth 1 https://github.com/milkv-duo/duo-sdk.git
2 Add GCC as Compilers to QtCreator
Launch QtCreator and select "Edit" → "Preferences" from the main menu bar. It may move around between releases, but you should eventually end up with a dialog similar to image 1. Click:
- "Kits"
- "Compilers"
- "Add ▾" and select "GCC" → "C++"
- Browse to or enter the full path to c++
- Select "riscv-linux-generic-elf-64bit"
- Enter a name of your liking that allows you to remember, that this is the C++ compiler for your Milk-V Duo.
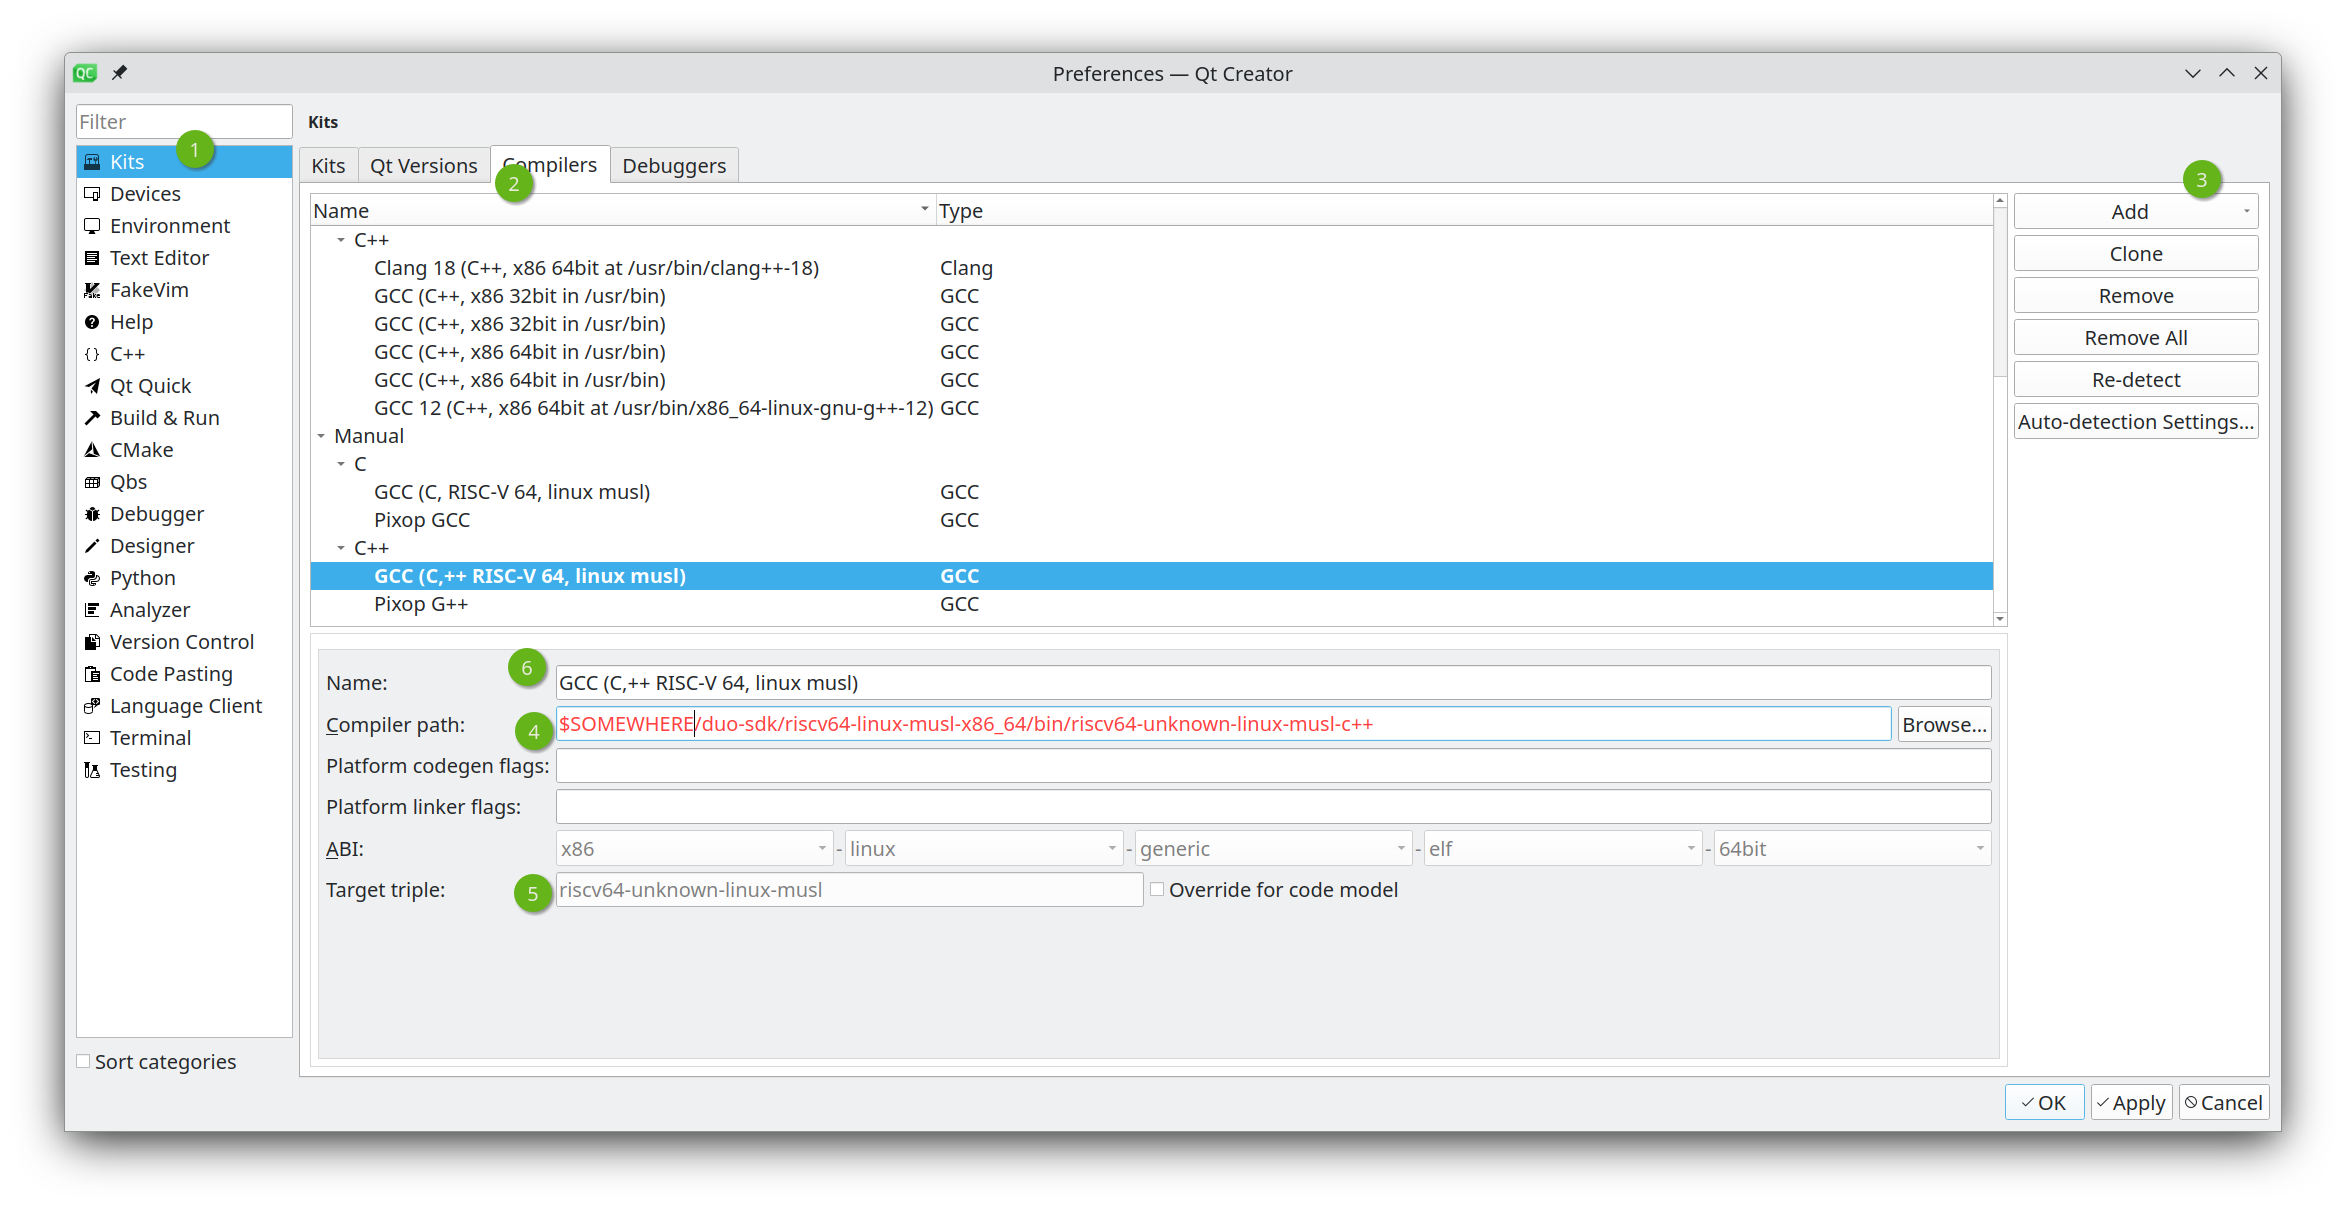
Repeat the process above, but select "GCC" → "C" instead and navigate to the C compiler instead like in image 2
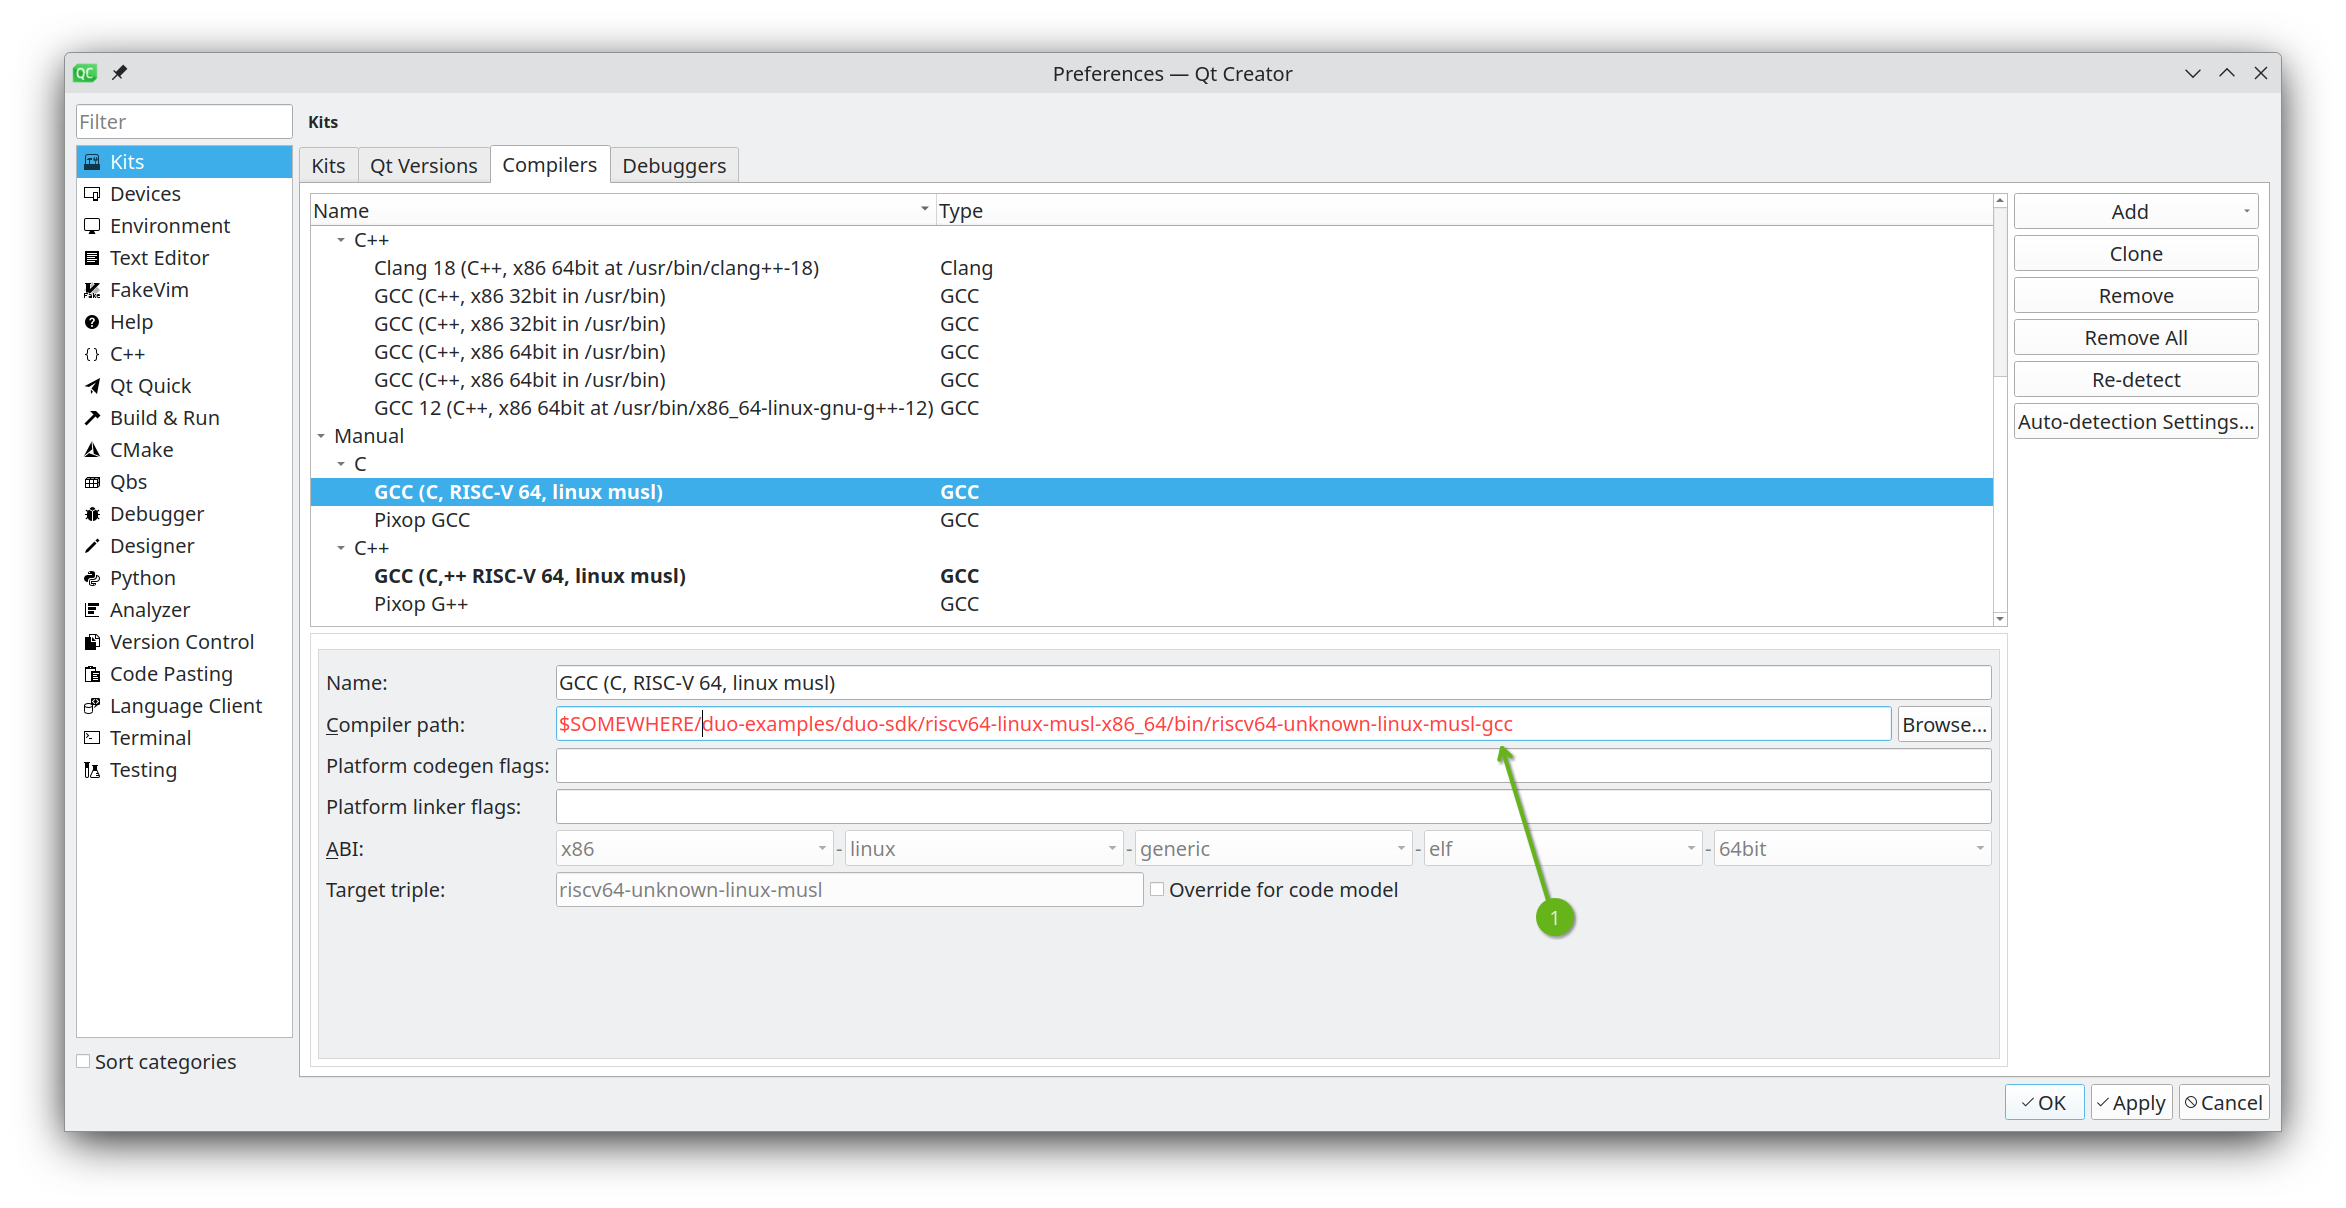
You may now close the preferences dialog.
3 Ensure You Have CMake
Since you have QtCreator installed, you most likely already have CMake installed. If you know you have CMake installed and registered in QtCreator, you can skip to section 5: Create a 'Kit'. If not, continue below.
Bring up the preferences dialog again by selecting "Edit" → "Preferences" from the main menu bar and click
- CMake
- Tools
- Check if you have a CMake auto detected. If you do have a CMake detected, you are fine and can jump directly to section 5.
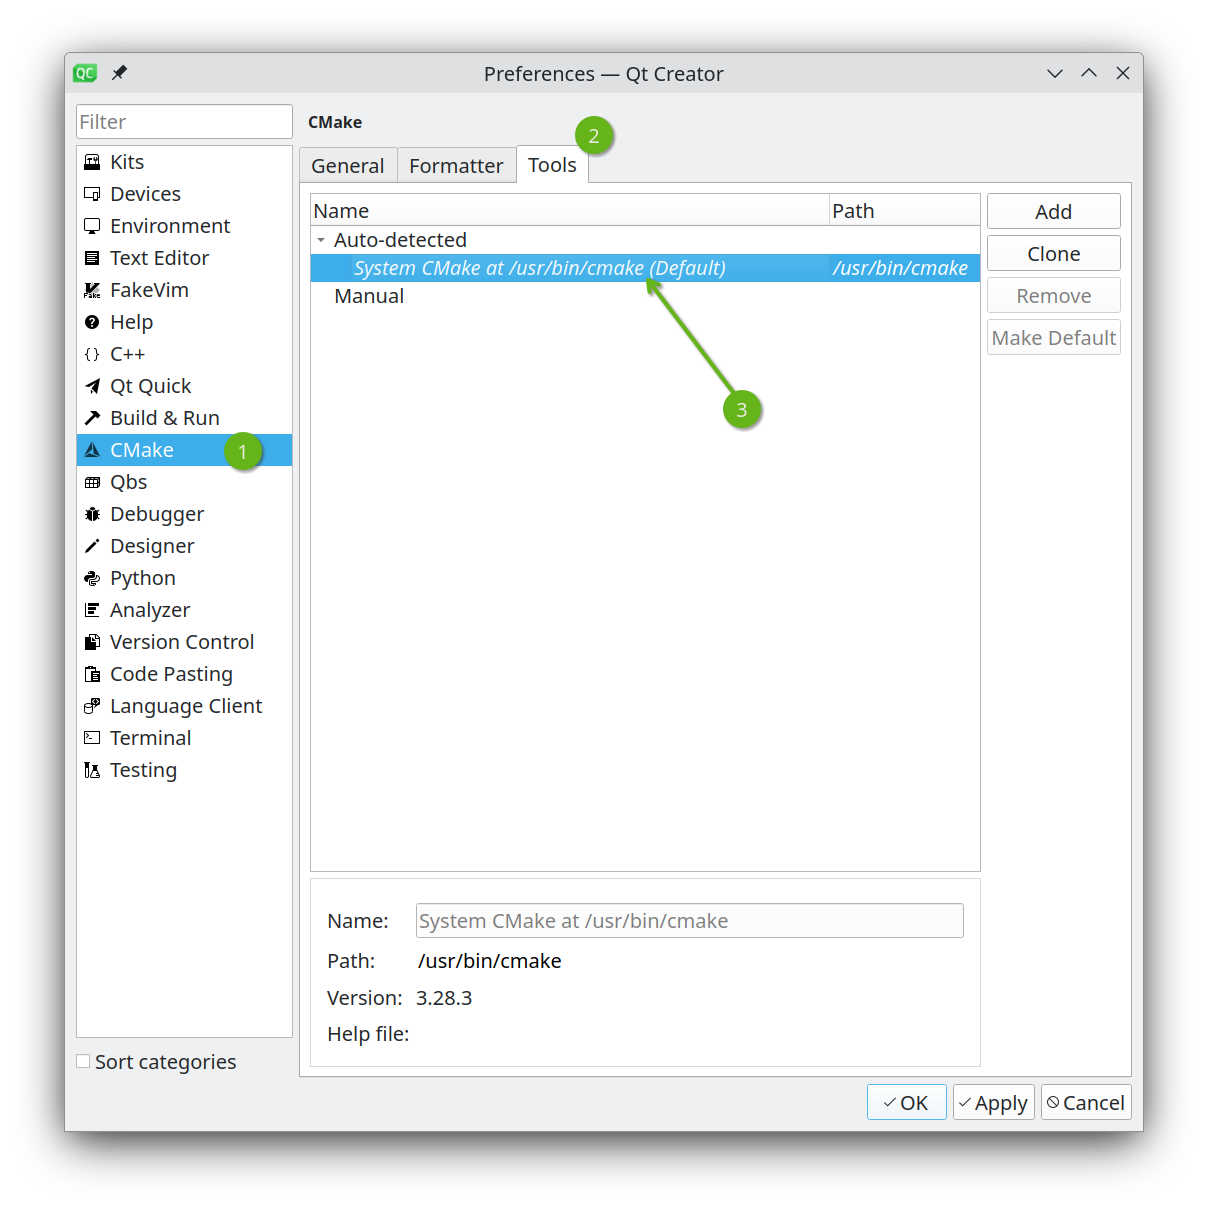
If you do not have CMake installed install it using your systems package manager, restart QtCreator and repeat section 3. Ensure You Have CMake until you have an auto detected CMake in step 3.
4 Create a 'Device'
QtCreator understands several kind of devices: Desktop PCs, cell phones and embedded devices to name a few. 'Devices' hold information1 on how to deploy a binary and how to connect to the device. We shall create a 'Milk-V Duo' device.
Bring up the 'Preferences' dialog again. By now you should be familiar with now to do that. Click
- Devices
- The 'Devices' tab.
- "Add…"
like in figure 4.
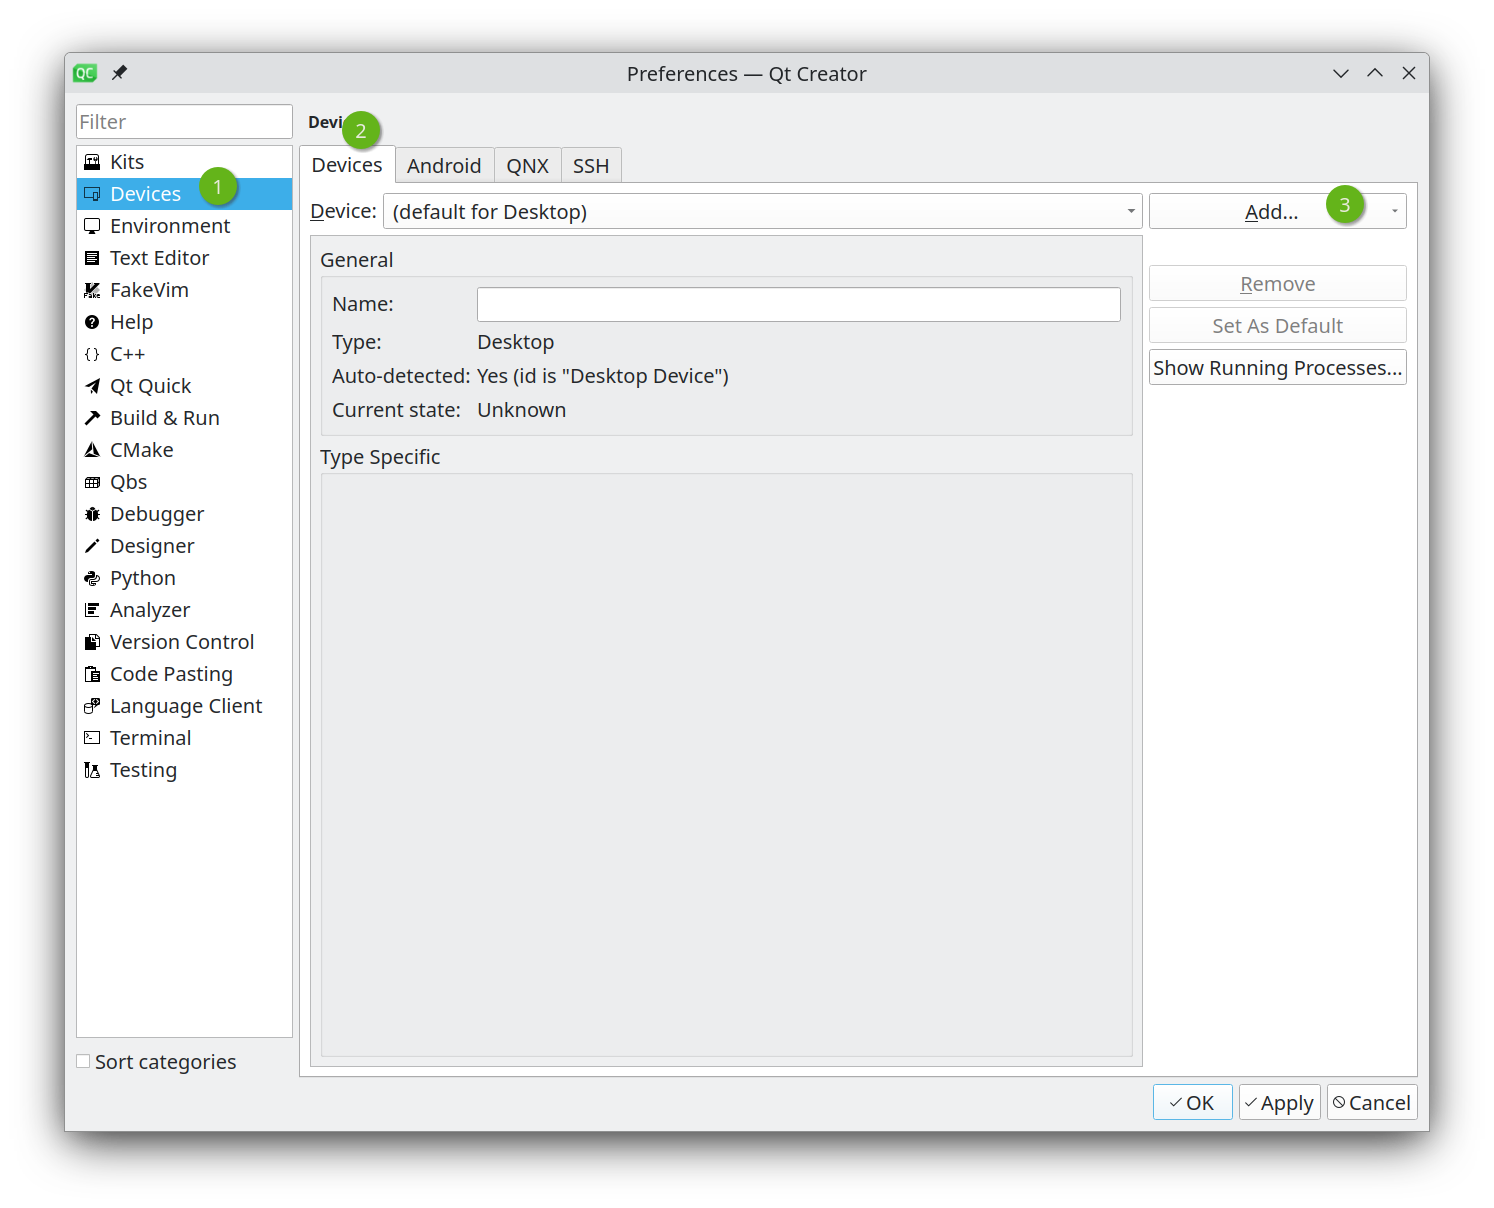
In the popup dialog as shown in figure 5 click
- "Remote Linux Device"
- "Start Wizard"
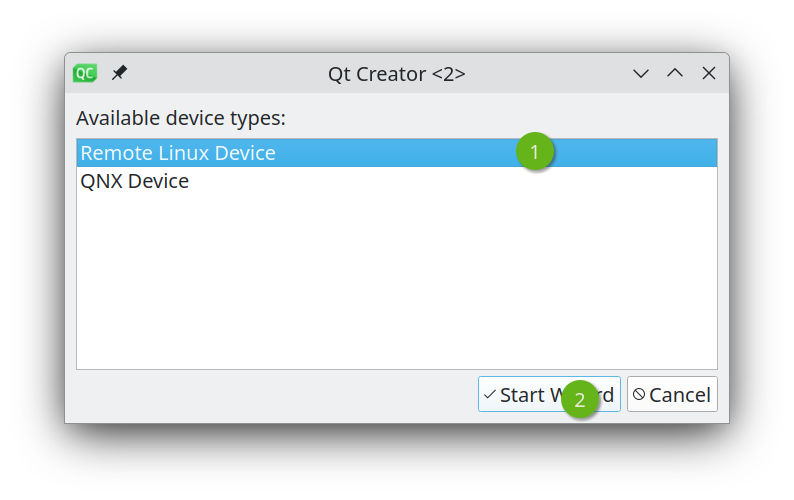
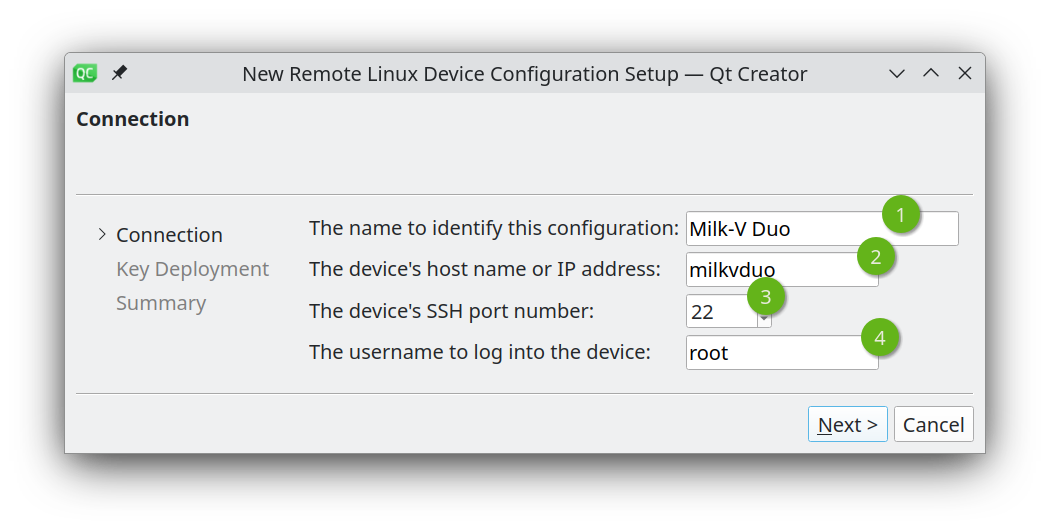
You will now be presented with dialog similar to the one in figure 6.
- Enter a name that you find fitting. Since we are setting up a Milk-V Duo board, 'Milk-V Duo' is a great name, I think. Much better than "BeagleBone(r) Black Industrial", at least.
- Enter the IP address or host name. Assuming you have set up ssh connections like in a previous post, enter 'milkvduo'
- Enter the port, your board is listening on. Unless you deliberately changed the ssh configuration on the board, enter 22. If you changed the port, you either know what you are doing of you are fucked.
- Enter the user you want to log on with. For pristine boards, this is 'root', If you changed that, refer to item 3 sentence 3 above.
- Finally, hit "Next"
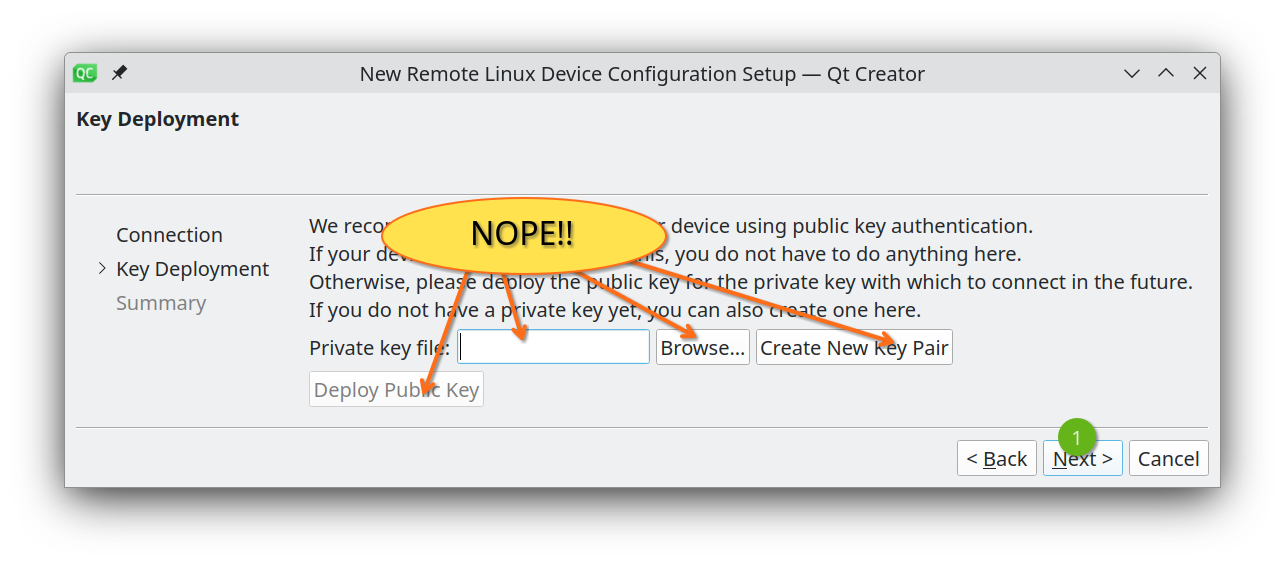
You will now be presented with the possibility of deploying keys to your Milk-V Duo as in image 7. Do not do that. I assume you have done that already, so simply hit "Next".
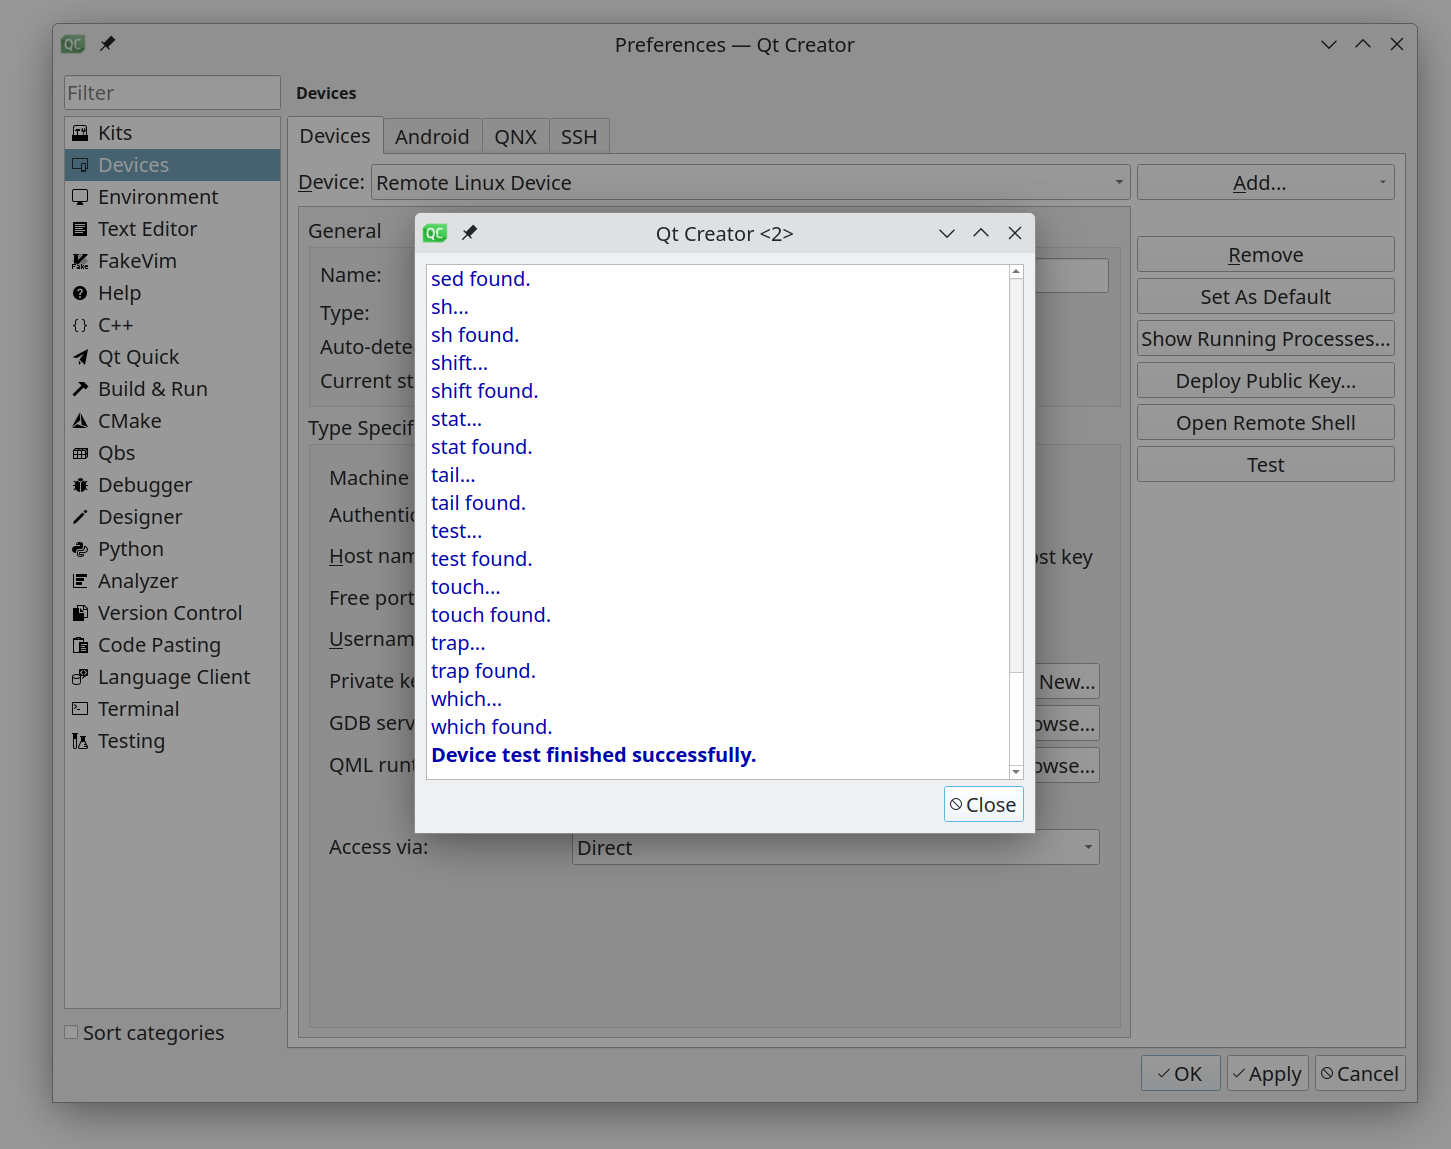
Having clicked "Next" QtCreator will test the connection to your new shiny 'device' and eventually you should see something similar to image 8. If you see anything that looks "not successful", try turning your computer off and on again and start all over. We shall assume you are in luck, and simply hit "Close"
You are now ready to create a 'kit' 🥳
5 Create a 'Kit'
A 'Kit' is a collection of compilers, a device and version of the Qt libraries. If you don't know what Qt libraries are, dint worry. We will not be using it here, but QtCreator is crafted for C++ development with the Qt libraries and as such the Qt libraries is an integral part of a kit, but we will leave it empty.
On we go and bring up the "Preferences" dialog and
- Click "Kits"
- Select the "Kits" tab
- Click "Add". This will create an unnamed and empty kit, which we will fill in now.
- Select a proper name for your kit. I suggest "Milk-V Duo via RDNSS" because "Raspberry Pi over RFC 2549" would be misleading.
- In the drop-down, select "Remote Linux Device"
- Select the device we created previously in section 4.
- Select the device we created previously in section 4.
- Select the C compiler you registered in section 2.
- Select the C++ compiler you registered in section 2.
- Browse to, or enter, the path to the sysroot folder in the SDK you cloned in section section 1.
just like shown in image 9.
- Is optional, but you may specify a nice icon for your new kit. I will suggest something with a fisted hand and an extended middle finger, because that seems to be how your new board thinks of you.
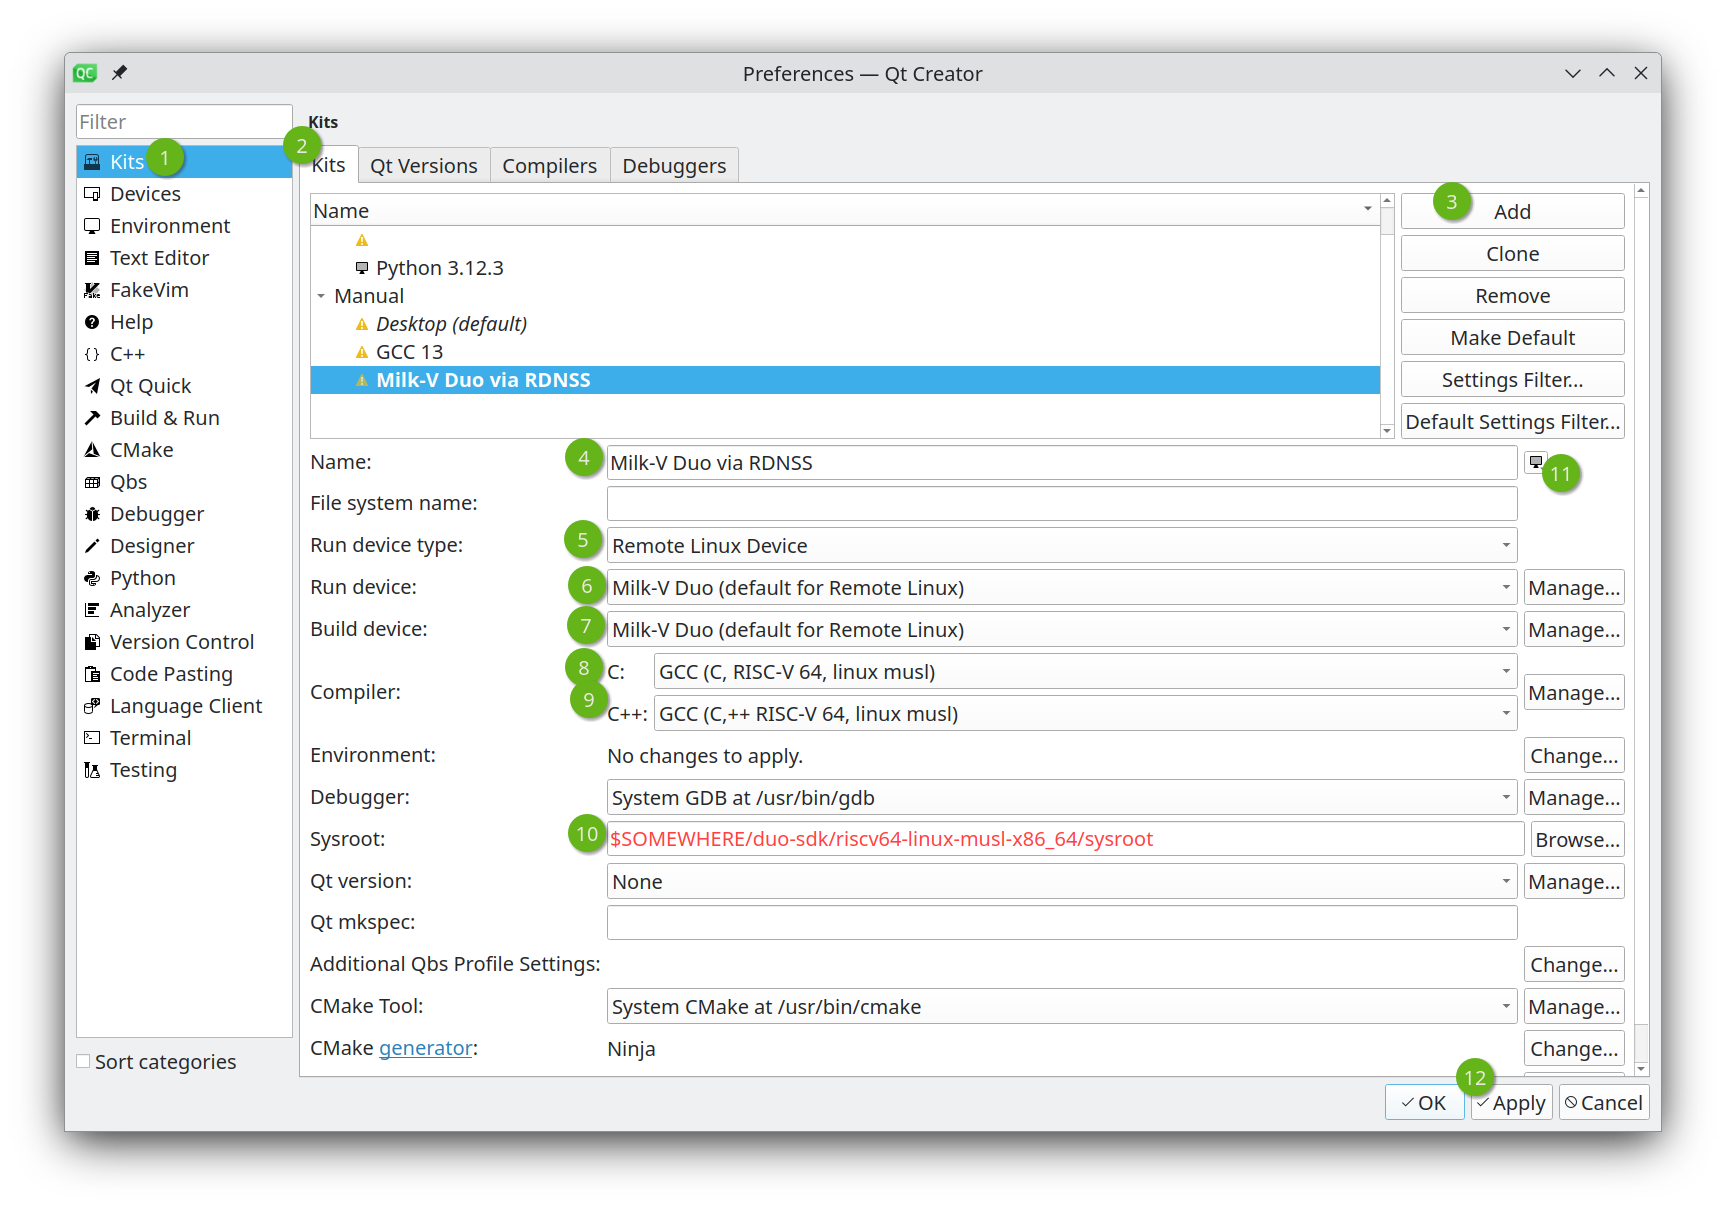
- Finally, click "Apply" and your new kit is created!
We can now proceed to use the kit and program the Milk-V Duo board.
6 Create a C++ Program for the Milk-V Duo
Finally, it is time to write code!! YAY!
Launch QtCreator, and hit CTRL-SHIFT-N to start a new project and click
- "Non-Qt Project"
- "Plain C++ Application"
- "Choose…"
like in image 10
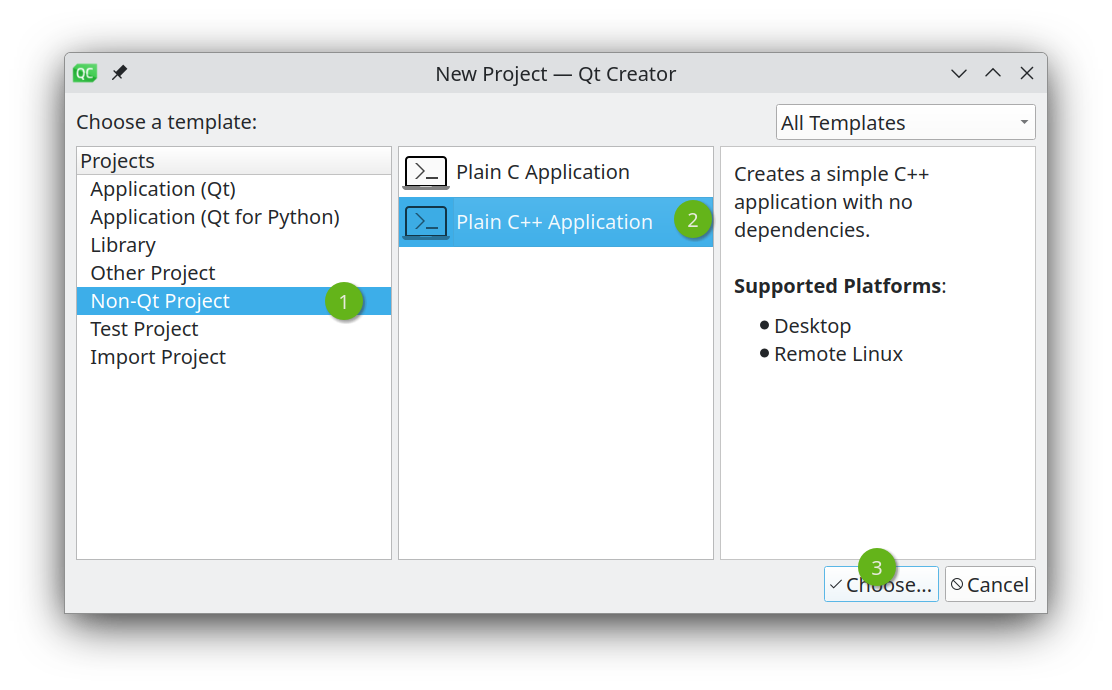
at the next dialog, image 11,
- Enter a name of your liking. In this post, we will use "mil-qt-v" because it
sounds like Mil-k-v… because it is afun play with words… Because I say so! - Pick a folder to store your new project in
- Click "Next >"
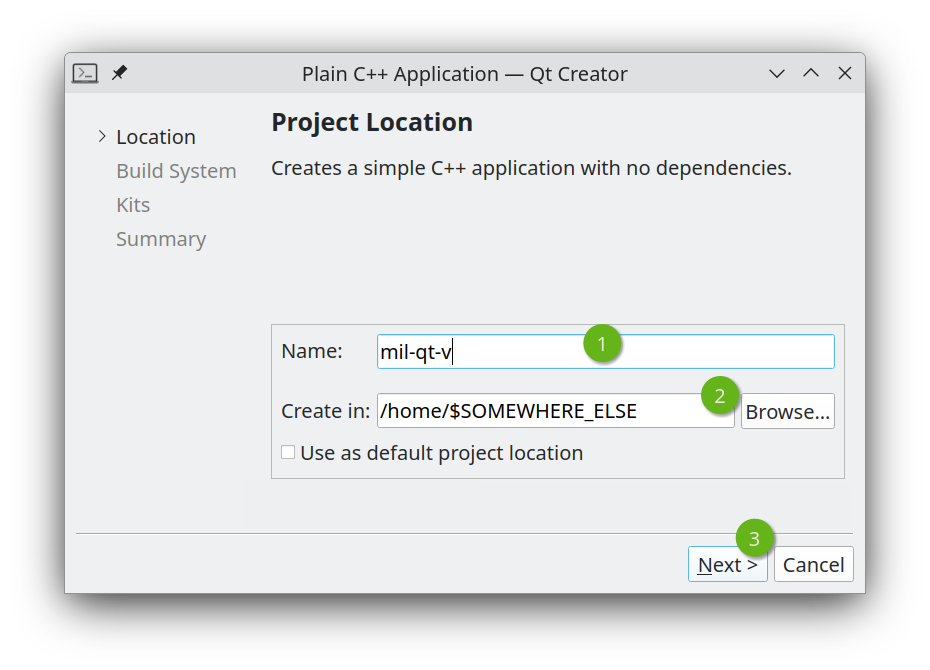
In the next step, as in image 12,
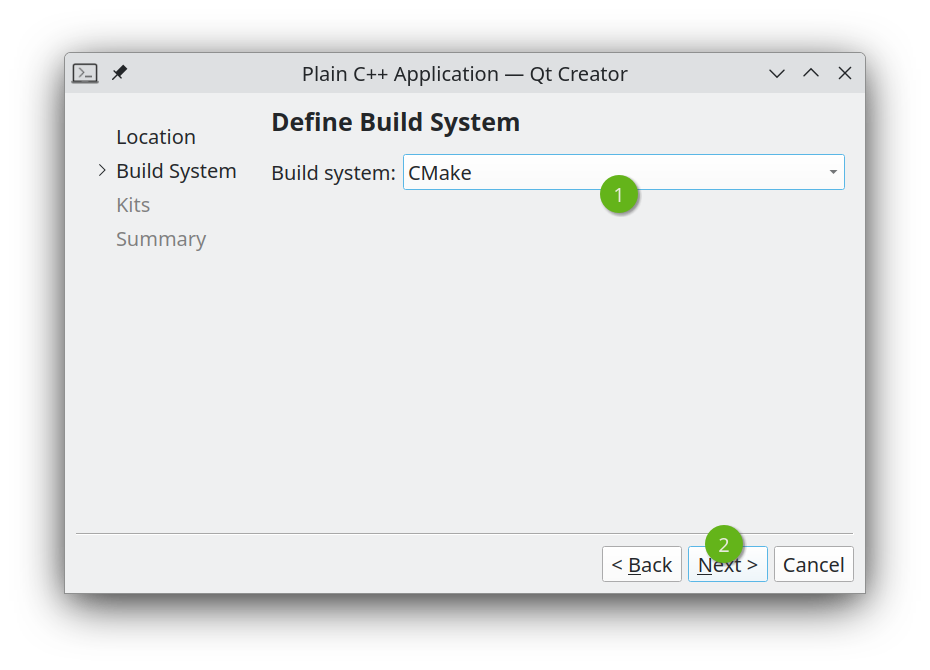
select CMake as build system and hit "Next >".
Now you need to select the kit we just created for your new project, like in image 13
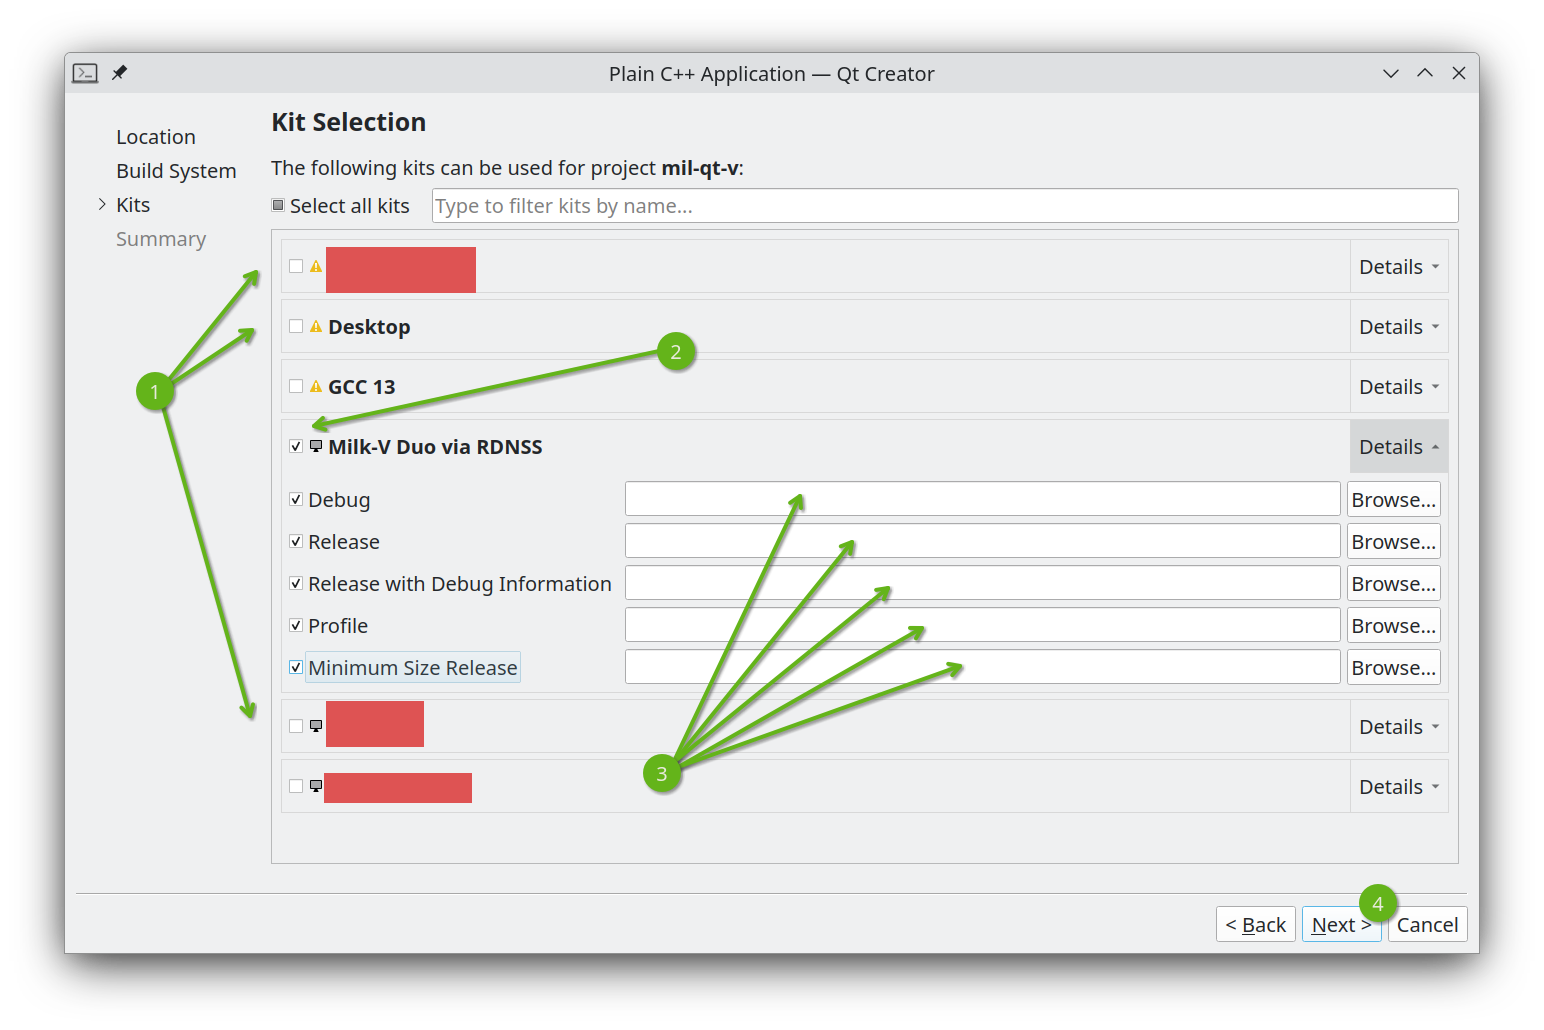
- Uncheck all kits you may have
- Make sure your new kit is checked.
- Checking the kit, will unfold a list of paths you can populate. Just leave them empty
- Click "Next >"
All you need to do now, is to configure the revision control system, you may want to use and you are done. See image 14
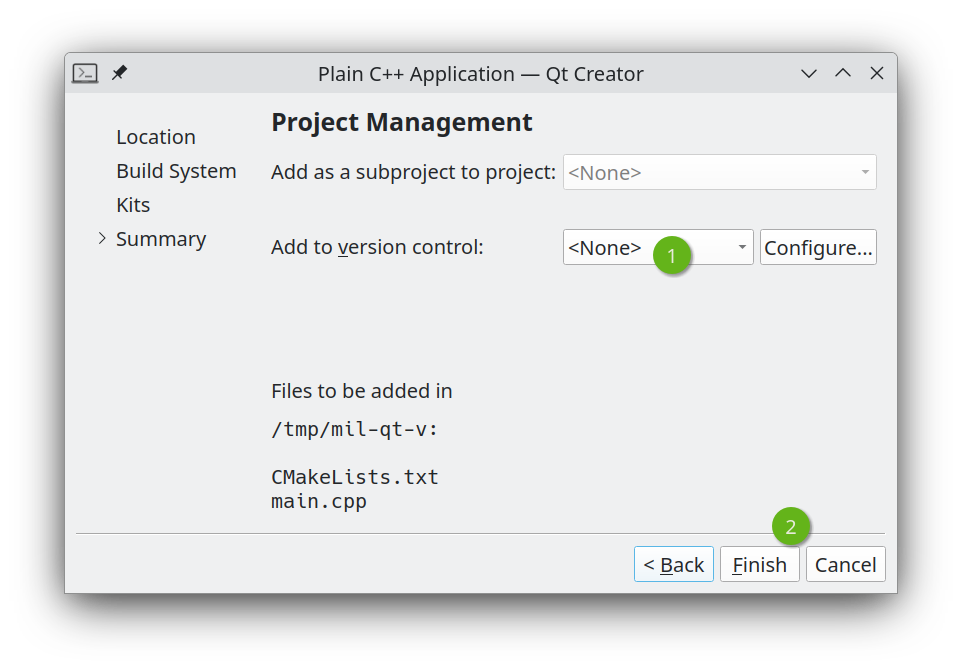
In this example we will
- Select <None> for revision control and
- Hit "Finish"
QtCreator will now do some work, and eventually you should see a screen like image 15
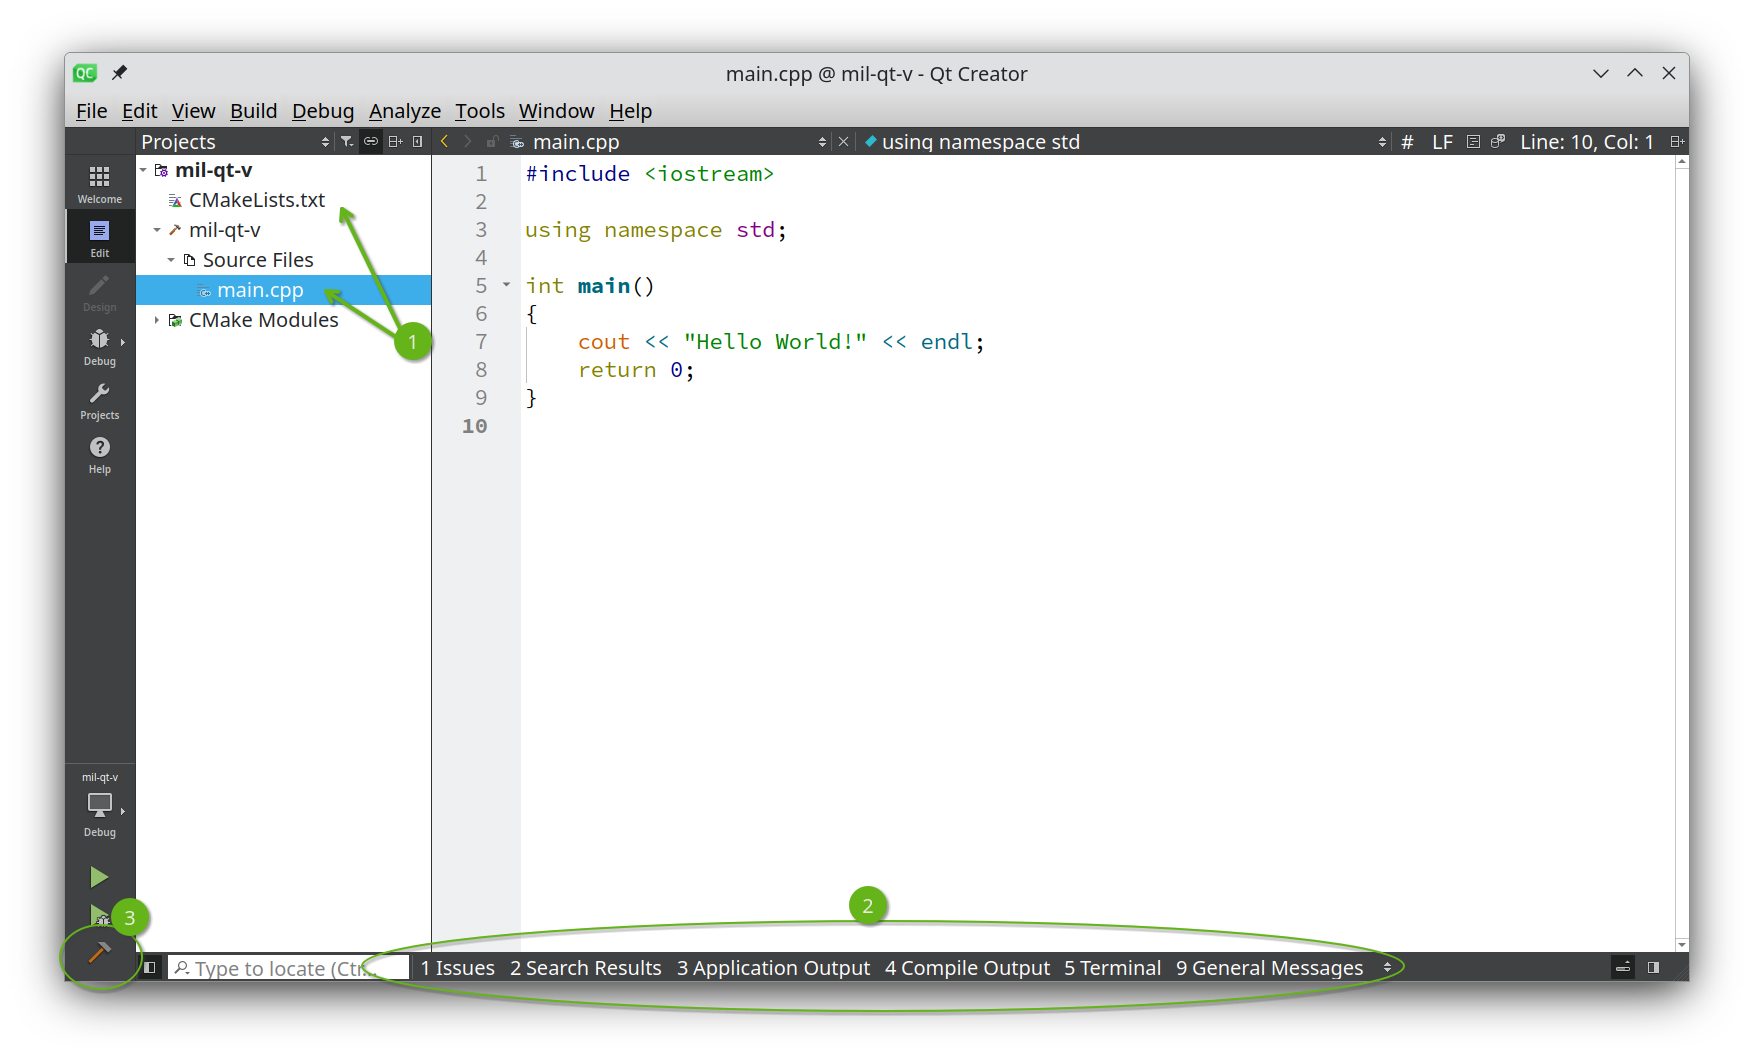
Image 15 also displays some interesting features of QtCreator:
- A project view with the only two files in your project right now:
- CMakeLists.txt
- main.cpp By clicking them you can get to edit them in the main view,
- A set of report views. By clicking the name of a view, you can open and hide it.
- The green hammer! When enabled you can press the hammer and your project is built. Output from the build process will be visible in the "4 Compile Output" report.
When you are done looking around, click the hammer and take a look at the "4 Compile Output". It should look like listing 2
13:49:56: Running steps for project mil-qt-v...
13:49:56: Starting: "/usr/bin/cmake" --build /tmp/mil-qt-v --target all
[0/1 0.0/sec] Re-running CMake...
-- Configuring done (0.0s)
-- Generating done (0.0s)
-- Build files have been written to: /tmp/mil-qt-v
[1/2 6.1/sec] Building CXX object CMakeFiles/mil-qt-v.dir/main.cpp.o
[2/2 9.8/sec] Linking CXX executable mil-qt-v
13:49:56: The process "/usr/bin/cmake" exited normally.
13:49:56: Elapsed time: 00:00.
Finally it is time to execute the program on your Milk-V Duo. Eagerly you click the  and wait for the "3 Application Output" report to show
 Hello World! but alas. All you get is listing 3:
13:52:17: Cannot deploy: rsync is only supported for transfers between different devices.
Error while building/deploying project mil-qt-v (kit: Milk-V Duo via RDNSS)
When executing step "Deploy files"
"What! The! Fuck!" is a reasonable thought here. Well. Do you remember the footnote from section Create a 'Device'? This is what comes back to bites us now. I have no idea why it is this way, but fortunately I can help you find a fix. We have to delete some so-called deploy steps and add some. On with yet another set of rubber gloves and click like in image 16
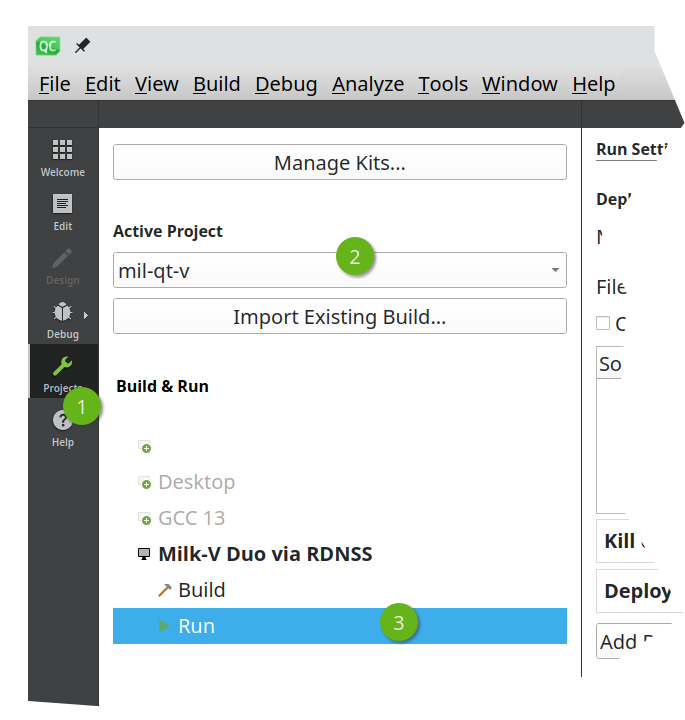
- Click "Projects"
- Select the project we are working on.
- Select the relevant "Run".
This should bring up quite some settings in the main window, like in image 17:
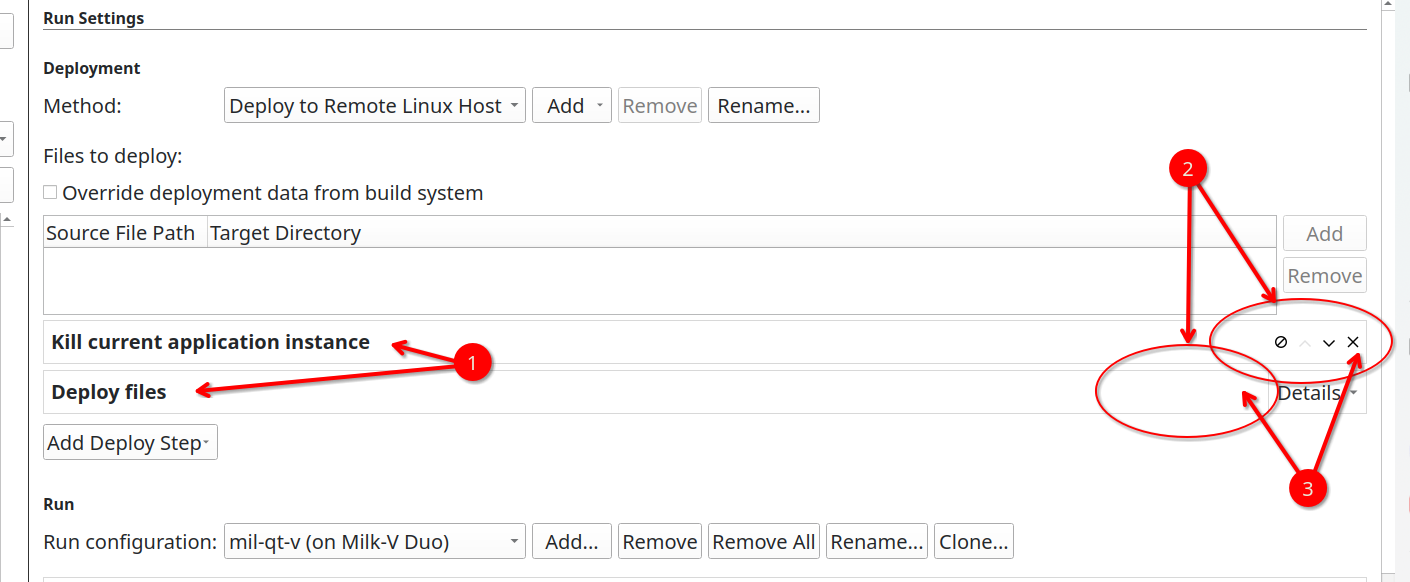
You need to delete all the existing deployment steps. In the example in image 17 there are two existing deployment steps:
- "Kill current application instance". See ①.
- "Deploy files" See ①.
You can delete those steps by clicking the 🞫 to the right, see ➁, but for some reason it has been decided to hide those until you hover the mouse there, so move your mouse to the areas marked with ➁ and the 🞫es will appear ( see ➂ ). Click the 🞫es and begone with them pesky deployment steps.
Now, we will add our own deployment step. Much shinier and our own to paraphrase Mr. Bender Bending Rodriguez. Click "Add Deploy Step", select Custom Process Step" and fill in the relevant details as in image 18:
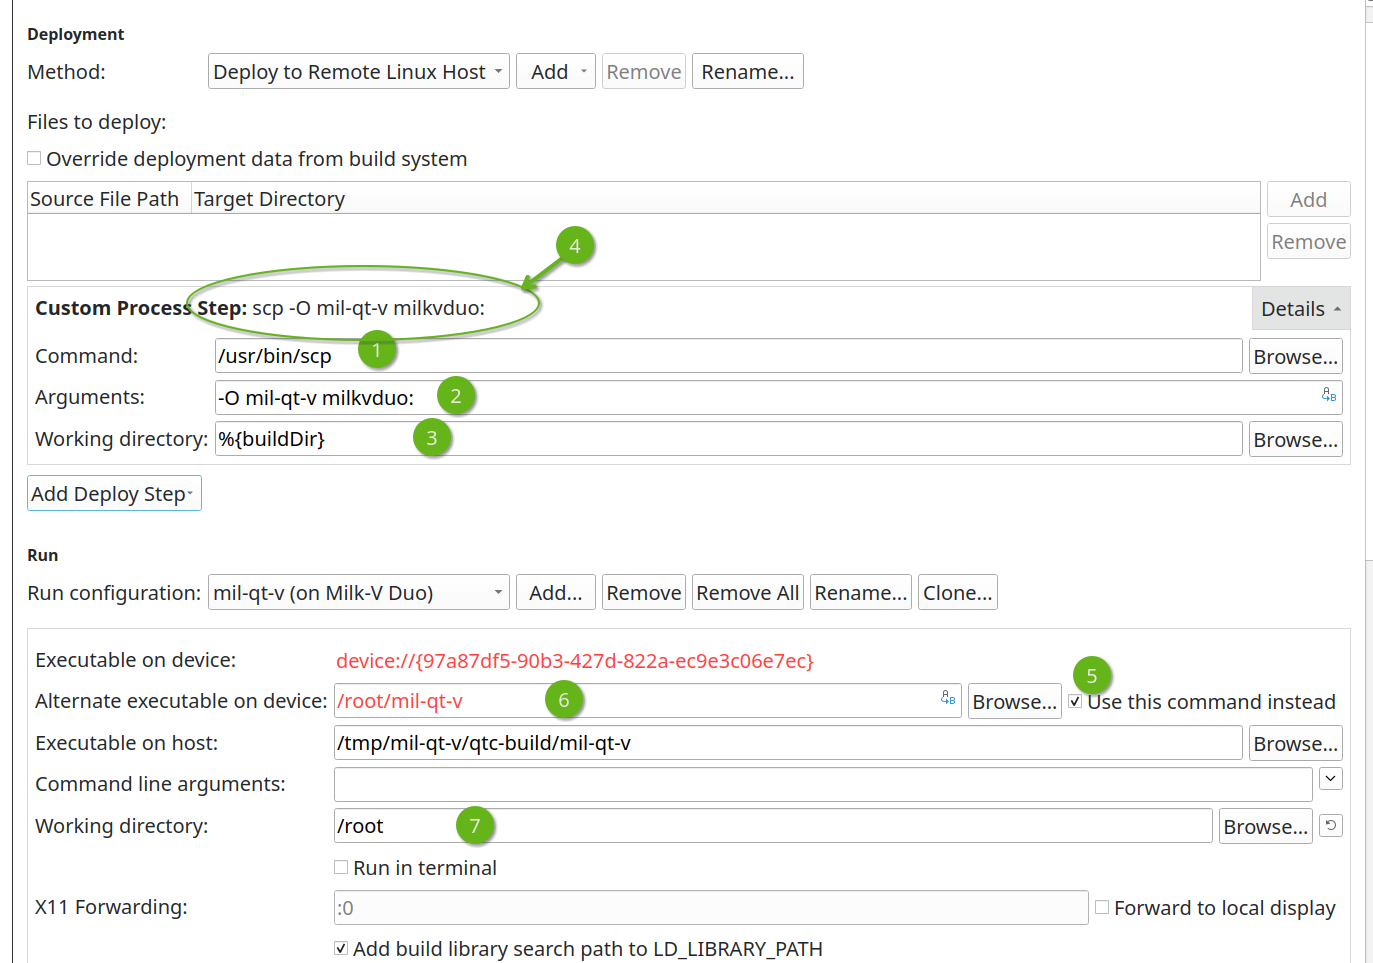
- Enter
/usr/bin/scpas "Command" - Enter
-O mil-qt-v milkvduo:as "Arguments" - Enter
%{buildDir}as "Working Directory"
Eventually, your entire command, see ➃, should look like this: scp -O mil-qt-v milkvduo:. Let's break that down:
scp- This is the command line utility that will perform the copy of your executable from your development machine to your Milk-V Duo.
-O- This flag tells
scpto use an older protocol. This may or may not be strictly necessary depending on your Milk-V Duo. mil-qt-v- This is the name of the executable that shall be copied to the Milk-V Duo.
milkvduo:- This is the host and path we want to copy the executable to.
Several of these values can be extracted from the kit or build system using QtCreator's variable substitution system, but for now this is clearer and easier to understand. To use variables is left as an exercise for the reader.
Now it is time to configure the actual execution of the binary on your Milk-V Duo. This is the "Run" step and we will configure that line in image 18.
- Check the "Use this command instead"
- Enter `/root/mil-qt-v` as "Executable on device"
- Enter `/root` as "Working Directory"
and leave everything else as it might be. And that's all. You have now configured QtCreator for building, deploying and running your application for and on the Milk-V Duo.
🎉 🥳
Eagerly we click the  again and look at the application output in report view 3 and see the output in image 19:

Again, a tirade of four letter words is on its place. What happened? You can log on to your Duo and check that the file definitely IS there. Then what?
"Well, well, well… If it ain't the invisible linker mistake!" to paraphrase Mr. Billy Butcher.
See, we have picked a tool chain that can produce Risc-V assembly code but not specified what standard libraries to use, what chip to target or what memory model or ABI to use, and this makes the executable unexecutable on the Milk-V Duo, and sh: exec: line 1: /root/mil-qt-v: not found is your Milk-V Duo's weird way of saying: "Well. The file is there, but I am unable to execute it.". So we need to perform one more step, I promise, and then everything will work just fine. Change your CMakeLists.txt to contain listing 4:
cmake_minimum_required(VERSION 3.5)

project(mil-qt-v LANGUAGES CXX)

set(CMAKE_CXX_STANDARD 17)
set(CMAKE_CXX_STANDARD_REQUIRED ON)

set(CMAKE_CXX_FLAGS "-mcpu=c906fdv -march=rv64imafdcv0p7xthead -mcmodel=medany -mabi=lp64d")
set(CMAKE_C_FLAGS "-mcpu=c906fdv -march=rv64imafdcv0p7xthead -mcmodel=medany -mabi=lp64d")

add_executable(mil-qt-v main.cpp)
- Save the CMakeLists.txt
- Select "Build" → "Clear CMake Configuration" in the main menu bar.
- Select "Build" → "Run CMake" in the main menu bar.
and then hit the  and observe listing 5 in the "3 Application Output" report view.
09:32:28: Starting /root/mil-qt-v on Milk-V Duo...
Hello World!
09:32:28: /root/mil-qt-v on Milk-V Duo exited with code 0
Congratulation! You have now, through around 70 easy steps, configured QtCreator for building, deploying and running C++ applications for and on your Milk-V Duo.
If you have any questions, comments or corrections, please drop me a message using the form below. Thanks for reading!
7 Notes
-
Not all information needed is stored on the 'device', though. The concept is a good idea, but the realization is not a complete abstraction. But hey… I like QtCreator as an IDE, so less is infinitely better than zero. ↩